"Annie"
Colored Pencil Demonstration
Image size: 11 x 12.5"


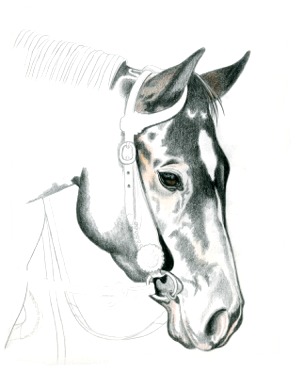
                                            Step One  
                           
This drawing is a portrait of a little Quarter Horse Mare that
 belonged to my daughter . I've started the drawing by transferring the preliminary sketch to Fabriano Watercolor paper. 

One of my favorite parts of a portrait is the eyes.  It's what brings the drawing to life, so usually I'll start with the eyes. The pencils used to create the eye are: Prismacolor Verithin Black to define the shape of the eye and eyelids, Prismacolor Black around the peripheral of the eyeball, Prisma Sienna Brown for the iris,White for the glisten in the eye and eye lids. The lashes are  Prisma Cool Grey 20%.  Burnish the iris with White then soften it into the rest of the eye with a Colorless Blender.

I've also defined the outline of the head, ears, nostrils,
bridle, etc with Verithin Black.  The shadows and dark areas on the face are softly layered by using a circucular
motion with Prismacolor Black.  Prisma Sienna Brown is
also used where the black hair is faded around the eyes,
ears and nostril.


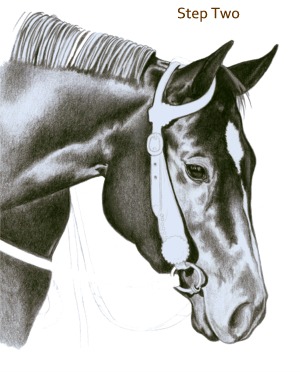
In this step I've filled in with Prisma Black all the dark shading, shadows and confirmation of her head and neck.
Be sure to leave any highlights white because black does not erase well.  There is actually no blue in the drawing at this point, scanners 'read' white paper as blue so the maze of white inside the drawing shows as blue.  Prisma Black, Slate
Grey and Sienna Brown are layered over each other to achieve a soft hair coat. The more you layer, the darker the color will become. I'm still using a soft circular motion. The shadows from the bridle are done in Black and Slate Grey and with heavier pressure. A hint of Slate Grey and Sienna
Brown will separate her mane from the darker color of her hair coat.  Leave a white shine through the middle of the mane and burnish with White.


This looks like a big jump in steps but it's actually just the same colors layered over and over with a little Prismacolor Copenhagen Blue at the edges of the white highlights.  The highlights  are burnished with White, working into the dark coat making a soft transition then I finish burnishing with a Colorless Blender.  I don't usually start the burnishing process until I have the paper covered well enough that very few white specs of the paper are showing. At that point you know you have enough pigment to blend well.  I've let the
white of the paper become the star on her forehead, no need to apply White. The snip down her face however was a little shadowed so I applied a faint coloring of Slate Grey, burnished with White. The muscles and bone structure start to surface when you pay careful attention to the shape of the mare's face
and neck.
                
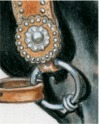
The bridle is filled in with Derwent Burnt Yellow Ochre, with a hint of Prisma Dark Umber on the edges of the leather and in the shadows. The tricky part is leaving all the studs and the conchos of the headstall white.  Black smudges easily so always use a slip sheet under your hand to prevent it. I've used Verithin Black to sharpen the details, especially in the headstall.  Also notice that sometimes a white reflection will show on the edge of the reins and bridle. That will be burnished with white. If you need to soften, use the Colorless Blender.


The insert shows the detail of the bridle and snaffle bit. The colors used on the bit and conchos are: Prismacolor Cool Grey 50%, Copenhagen Blue, Verithin Black, burnished with White. The horse's coat as well as the metal reflect the blue of the sky.

You can develop nice contrast and very dark colors with layering.  If your paper reaches the point where it does not want to take more color use a workable fixative, then apply color. Once the piece is finished, clean up the white background with an eraser and spray with a fixative.


All Artwork Copyright Protected by the Artist